
Get started with 365 business Banking
Seven steps from installation to your first payment: how to set up 365 business Banking in Microsoft Dynamics 365 Business Central.
Each step links to the detailed guide. You perform steps 1 to 3 once per company. After that, you connect each additional bank account in a few minutes.
Requirements
365 business Banking runs on Business Central 25 (2024 release wave 2) and newer, in Business Central online and on-premises alike, from one code base. A few features rely on events or fields that Microsoft added in later versions. These features are not available on older versions; all other features work identically:
| From | Feature | On older versions |
|---|---|---|
| BC 26 | Suggest Vendor Payments in a Banking payment journal leaves out vendor ledger entries whose payment method differs, and reports them afterwards | The entries are suggested regardless of their payment method. |
| BC 27 | G/L entry matching in the payment reconciliation (Enable General Ledger Entries Matching) | not available, the switch is not shown |
| BC 28 | Summarize per Vendor is read directly from Suggest Vendor Payments | the same result through an older event; no difference in use |
| BC 29 | Reversing a posted payment reconciliation takes along unrecognized entries through Microsoft's own event | the same result through a table trigger; no difference in use |
Step 1: Install 365 business Banking
In Business Central, open the Extension Marketplace, search for 365 business Banking and install the app. Alternatively, install it directly from Microsoft Marketplace: Install 365 business Banking | Microsoft Marketplace
During installation, 365 business Banking creates number series, codes and default values. For details, see What installation sets up.
Step 2: Check license and permissions
Assign the Banking (Base) permission set to the users who work with Banking. Users who set up Banking and do not have SUPER also need 365 Banking - Setup. For EBICS, you also need the EBICS Connection license.
Details: Permissions and licenses.
Step 3: Banking setup and company bank access
- Choose the Search icon, enter Banking Setup and open the page.
- Choose Company Bank Access.
- Check Email Address and Phone Number and choose Connect.
This step is always required
This step is also required if you do not connect any account via finAPI. Verification of payee runs through the company bank access. Without it, no verification takes place.
For more information, see Banking setup.
Step 4: Choose the right bank connection
| You want to … | Then … |
|---|---|
| start with low setup effort and approve payments by TAN | PSD2/XS2A via finAPI, continue with step 5 |
| run large payment runs without a TAN, also in the background | EBICS, first set up an EBICS participant (takes a few days) |
| have no external connection | camt/pain file, continue with step 5 |
| connect PayPal, Stripe, Adyen and others | Payment service providers, continue with step 5 |
For a detailed comparison, see Choose a bank connection.
Step 5: Connect a bank account
-
Choose the Search icon, enter Bank Accounts and open the list.
-
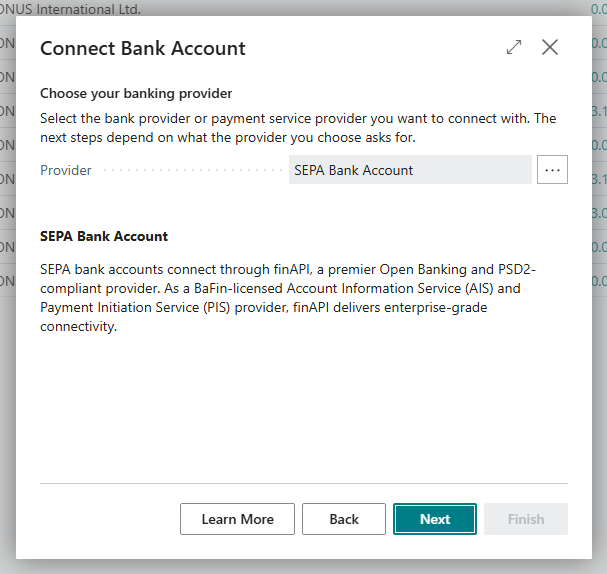
Choose the Connect Bank Accounts action. The Connect Bank Account wizard opens.
-
Choose Next and, in the Choose your banking provider step, set the Provider field.
-
Follow the provider's steps and choose Finish.
The steps per provider are described in Connect a bank account and on the page of each connection: PSD2/XS2A, EBICS, camt/pain file, payment service providers.
Step 6: Retrieve and apply bank transactions
- Open the Payment Reconciliation Journals list and choose Retrieve Bank Transactions. Alternatively, choose the action in an open payment reconciliation journal.
- 365 business Banking creates the transactions in the payment reconciliation journal and applies them automatically to open entries.
- Review the matches, correct them if needed and post.
Tip
With reconciliation rules, you post recurring transactions such as fees or interest automatically. With automated retrieval, transactions are retrieved automatically on a schedule.
For more information, see Retrieve bank transactions and Apply bank transactions.
Step 7: Make your first payment
- Open a Payment Journal whose journal batch has your bank account as balancing account and a payment method.
- Create the lines manually or with Suggest Payments (the extended payment suggestion).
- Check amounts, payment reference and Recipient Bank Account and choose Carry Out Payment.
What happens next (TAN in the web form, submission via EBICS or a payment file to upload) depends on the payment initiation service. See Carry out payment: process per bank connection. If payments of more than EUR 12,500 go to recipients outside Germany, Carry Out Payment points out the reporting obligation under section 67 AWV and asks whether to continue. You file the report to the Deutsche Bundesbank separately.
User guide
The user guide summarizes working with 365 business Banking 18.4 in one PDF as a reference for users and consultants, with links to the pages of this documentation. It is available in German: Anwenderleitfaden 365 business Banking 18.4 (PDF, German).