
This quick guide explains how to install and set up 365 business Proxy Application in your Microsoft Dynamics 365 Business Central environment.
Prerequisites
- Microsoft Dynamics 365 Business Central 2021 release wave 1 (18.0) or newer.
- A Microsoft Windows client device to run 365 business Proxy Application Client.
- An internet connection.
For more information on setting up other plugins, please visit the documentation.
Step 1: Installation of 365 business Proxy Application
Open the Marketplace for Extensions in Microsoft Dynamics 365 Business Central and search for 365 business Proxy Application. Install the app from Microsoft AppSource and wait until the installation is complete.
Step 1.1: Proxy application setup
To set up the 365 business Proxy Application, open the Proxy Application Setup page in Microsoft Dynamics 365 Business Central.
- select Authenticate to connect your Microsoft Dynamics 365 Business Central environment to 365 business Proxy Application Service.
- copy the Tenant ID value by clicking on the field value.
Note: Specifies the Tenant ID used to secure the communication between the Proxy Application Service and Microsoft Dynamics 365 Business Central.
- select Download client… to download 365 business Proxy Application Client.
Step 1.2: Installing 365 business Proxy Application Client
- save the downloaded ZIP file on the server or computer you want to use with 365 business Proxy Application.
- unpack the ZIP file (e.g.
C:\install) - start the setup file and follow the instructions
- enter the Tenant ID from the previous step and a Name for the client, which will help you to identify the client in Microsoft Dynamics 365 Business Central.
- (Optional) Enter a domain user and the password with which 365 business Proxy Application Client is to be operated.
Note: If you do not specify a user, 365 business Proxy Application Client will run in the Local System context.
Step 2: Set up Proxy Application Client
To be able to access the Proxy Application Clients directly in Microsoft Dynamics 365 Business Central, the clients must be activated.
- open the Proxy Application Setup in Microsoft Dynamics 365 Business Central.
- when opening the page, all available 365 business Proxy Application Clients are automatically retrieved and displayed in the setup:
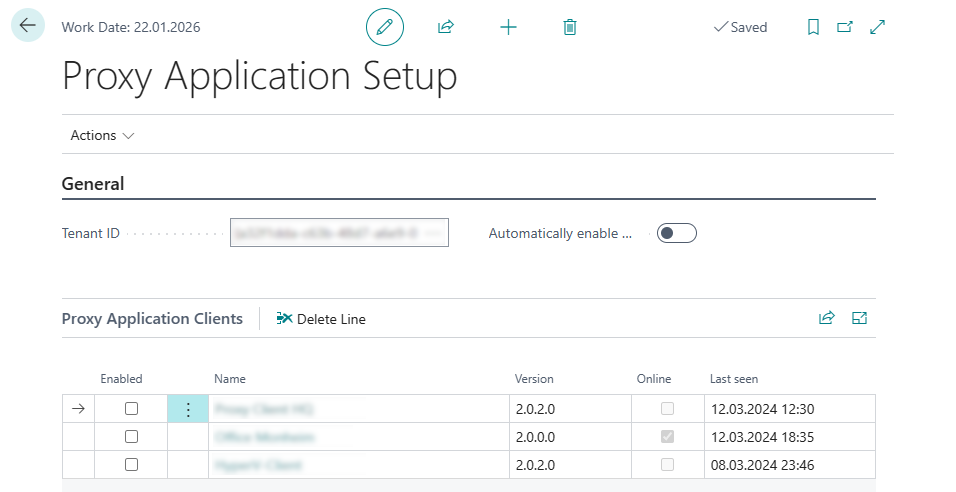
- select Enabled to enable a proxy application client for use.
- click on the Name of the Proxy Application Client to open the map.
- in the Proxy Application Client card you will find the Client ID field.
Note: The Client ID is used to address the Proxy Application service. 365 business Proxy Application provides additional functions to return the clients that support a specific plugin. In this quick guide, however, it is assumed that the specific client ID is used.
Step 2.1: Install Proxy Application Client Plugins

- open Microsoft Dynamics 365 Business Central.
- open Proxy Application Clients page.
- select Refresh to load the available 365 business Proxy Application Clients.
- select the desired proxy application client based on the name you assigned in the previous step.
- select Install plugins.
- click Next.
- select the plugins (e.g. File Plugin) that you want to install.
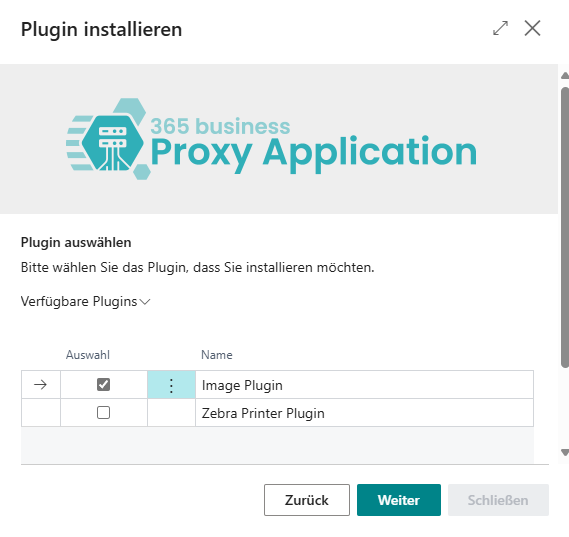
- click Next.
- after the successful plugin installation, click Close.
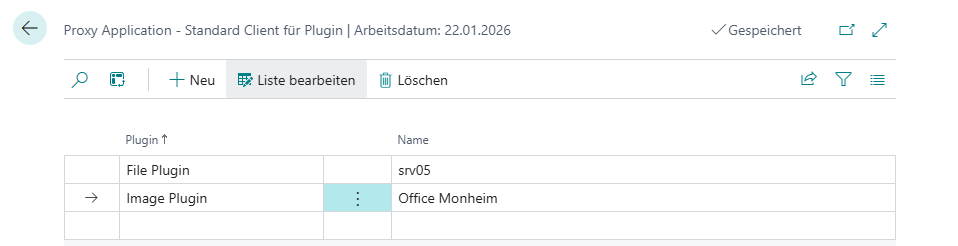
Step 2.2: Standard clients for plugin (Optional)
To simplify the control of clients, it is possible to define a standard client for plugins. This allows you to enable 365 business Proxy Application to automatically select the client for the current plugin.
- open Microsoft Dynamics 365 Business Central.
- open Proxy Application Setup page.
- select Associated.
- select Standard Clients.
- select the Plugin for which you want to set a default client (e.g. File Plugin).
- select the Name of the client.
Step 3: Implementing the file plugin
This quick guide explains how to write a file to your local file system using 365 business Proxy Application. The following is an AL extension for Microsoft Dynamics 365 Business Central. This quick guide assumes that the AL project already exists and only needs to be extended to include integration with 365 business Proxy Application.
Step 3.1: Dependency on 365 business Proxy Application
To be able to access the functions in 365 business Proxy Application, your AL extension must define a dependency to 365 business Proxy Application.
- open the application manifest (
app.json) in Visual Studio Code. - add the following entry to the JSON token
dependencies:[..], "dependencies": [ { "id": ‘ae907ccb-e4a3-4594-9955-bd931031af8f’, "name": ‘365 business Proxy Application’, "publisher": ‘365 business development’, "version": "18.0.0.0" } ], [..] - execute the command AL: Download symbols.
Step 3.2: AL implementation
In the following, a file is written as an example and then read again. This quick guide assumes that a file with the content “Hello, World!” is to be written as test.txt in the path C:\temp.
Detailed documentation can be found in the Plugin documentation.
- open an existing code unit or create a new AL file in which the AL code can be developed
- insert the following AL code:
procedure WriteAndReadHelloWorldFile() var proxyApp: Codeunit "bdev.PRX Proxy Application"; file: Codeunit "Temp Blob"; filePath: Text; sampleText: Label 'Hello, World!', Locked = true; begin // write "Hello World" into the text file CreateFileInTempBlob(file, sampleText); // set file path filePath := 'c:\temp\test.txt'; // write file to filesystem if (not proxyApp.PostFile( filePath, file )) then Error('Failed to write file!\Error: %1', GetLastErrorText()); Clear(file); // reset temp blob // read file from filesystem file := proxyApp.GetFile( filePath ); // compare content with expected content if (ReadContentFromTempBlob(file) <> sampleText)then Error('The file content does not match.') else Message('The file has been written.'); end; local procedure CreateFileInTempBlob(var file: Codeunit "Temp Blob", fileContent: Text) var stream: OutStream; begin file.CreateOutStream(stream, TextEncoding::UTF8); stream.WriteText(fileContent); end; local procedure ReadFile(filePath: Text): Text var proxyApp: Codeunit "bdev.PRX Proxy Application"; file: Codeunit "Temp Blob"; begin // invoke Proxy Application plugin file := proxyApp.GetFile( filePath ); exit(ReadContentFromTempBlob(file)); end; - execute the function
WriteAndReadHelloWorldFile().