
As explained in the section What is Print Agent?, the 365 business Print Agent can be run in two different service modes.
The service mode can be changed at any time under the Settings menu.
365 business Print Agent Cloud (recommended)
Using the 365 business Print Agent Cloud is the recommended method. The advantage is that it minimizes setup and is ready to use.
The following steps are required to print using the 365 business Print Agent Cloud:
Microsoft Dynamics 365 Business Central
- Install the “365 Business Print Agent” app from the Microsoft AppSource in your Microsoft Dynamics 365 Business Central tenant.
- After installation, select the “Print Agent Cloud” mode of operation in the 365 business Print Agent app.
- Select “Authenticate Print Agent” and copy the value “Tenant ID” from the field.
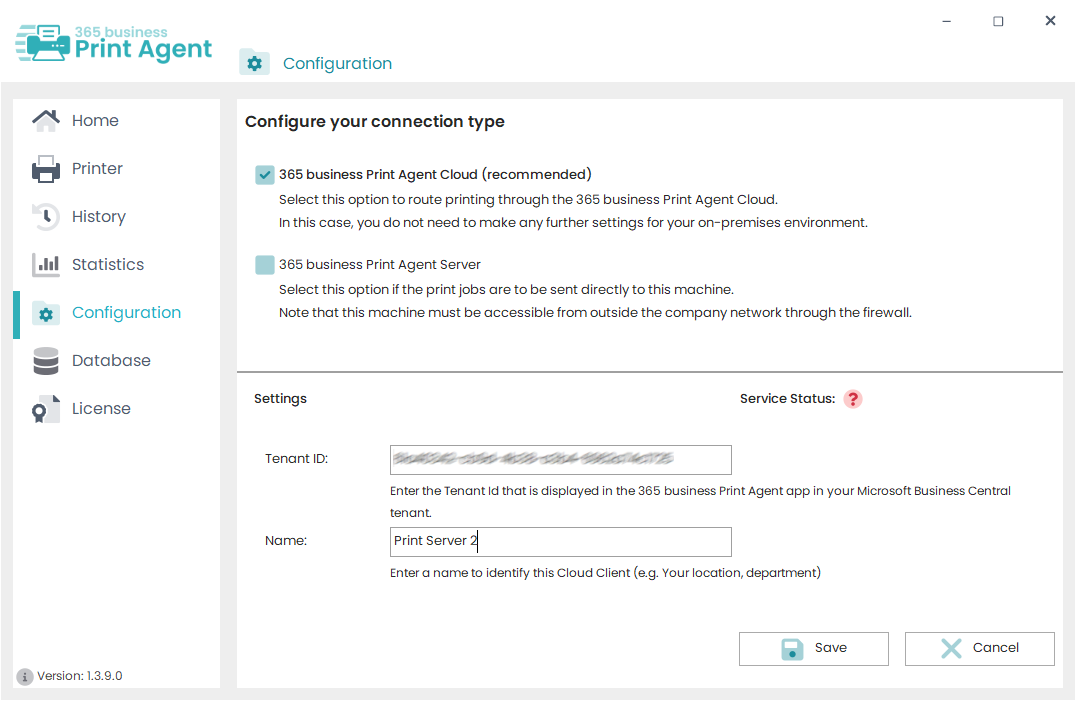
365 business Print Agent Config
- In 365 business Print Agent Config, open the “Settings” menu.
- Select “365 business Print Agent Cloud” option.
- Paste the “Tenant ID” you copied in step 3 into the appropriate field.
- Give your Cloud Client a name.
- Click “Save” to start the setup process.
The following dialog shows the setup process. When this dialog is closed and the “Service Status” displays a green check mark, the setup is complete.
Before you can configure in "365 business Print Agent Config", you must first install and set up the 365 business Print Agent app in your Microsoft Dynamics 365 Business Central tenant.
365 business Print Agent Server
Selecting the 365 Business Print Agent Server will establish a direct connection between Microsoft Dynamics 365 Business Central and the current system. Due to the complexity of configuring firewalling, network routing, etc., this connection is only recommended for use with your own on-premises environment, not for use with Microsoft Dynamics 365 Business Central SaaS environments!
The following steps are required to print using the 365 Business Print Agent Server:
Microsoft Dynamics 365 Business Central
- Install the “365 Business Print Agent” app from the Microsoft AppSource in your Microsoft Dynamics 365 Business Central tenant.
- Select the “Direct Connection” option, afert installation of the 365 business Print Agent app.
- Enter a name, the service address and the service port. These correspond to the IP or http(s) address of your internal 365 business Print Agent Server instance.
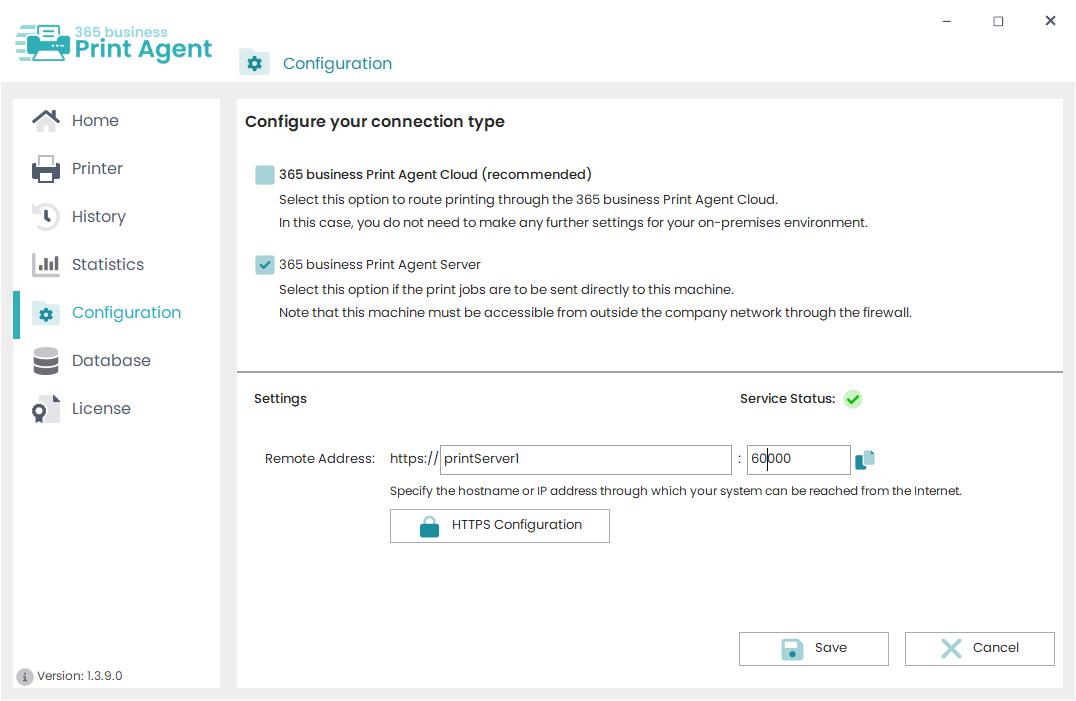
365 business Print Agent Config
- In 365 business Print Agent Config, open the “Settings” menu.
- Select “365 business Print Agent Server” option.
- Enter your hostname and port in the “Remote Address” field, on which the 365 business Print Agent Server instance should bind.
- Click “Save” to start the setup process.
The following dialog shows the setup process. When this dialog is closed and the “Service Status” displays a green check mark, the setup is complete.
After applying the settings and clicking "Save", the HTTPS configuration will be set up.