
Configure Printer Defaults for the Print Agent
Problem
If printing from a Windows application, such as a PDF reader, works correctly but the output differs when using the 365 business Print Agent, the cause is often a difference between the printer settings of the signed-in user and those of the printer queue.
This is especially common with label printers such as Zebra, SATO or CAB, but it can also occur with other Windows printer drivers.
Typical symptoms
Print jobs sent through the 365 business Print Agent may, for example:
- be shifted or clipped,
- be printed blank,
- appear rotated or mirrored,
- use an incorrect label size,
- use an incorrect media or sensor type,
- render barcodes or other content incorrectly or make them difficult to read.
Note
A print job that is output correctly from a PDF reader or another Windows application does not necessarily mean that the Print Agent uses the same driver settings.
Cause
The 365 business Print Agent runs as a Windows service and uses the Local System account by default.
Windows printer drivers can store different settings for the currently signed-in user and for the printer queue. As a result, an interactive print job started by a Windows user may use different settings than a job processed by the Print Agent service.
Typical printer-specific settings include:
- label width and height,
- print speed,
- print density / darkness,
- media or sensor type,
- ribbon usage,
- rotation / orientation,
- printhead offset,
- label offset.
Example: printer-specific driver settings
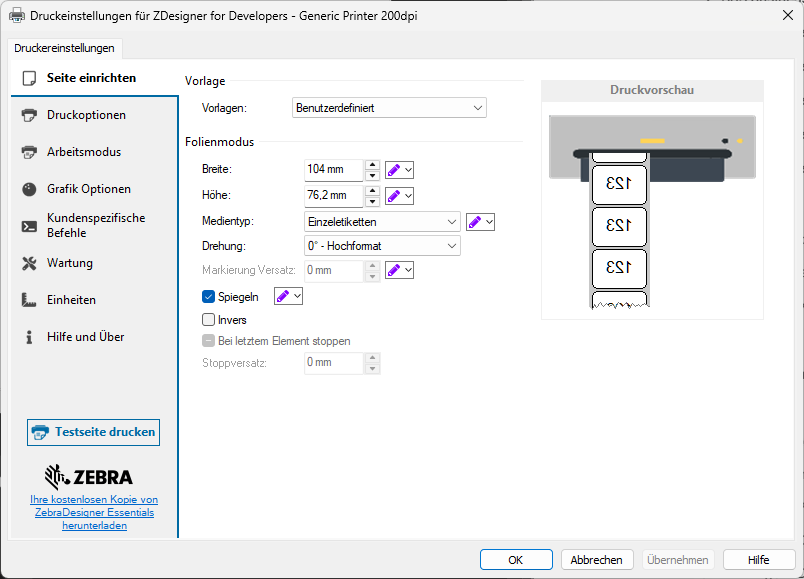
The example shows settings such as page size, non-printable area, printhead offset and label detection.
Solution
For printers used by the 365 business Print Agent, the relevant driver settings must be configured in the printing defaults of the printer queue.
To do so, use Set Printing Defaults in Windows Print Management. These values are the global defaults for the printer queue and are therefore also available to the Print Agent service.
The regular printing preferences of a signed-in Windows user may differ from these defaults.
Use the printer manufacturer's original driver
Always use the latest original driver provided by the printer manufacturer with the 365 business Print Agent.
Whenever possible, avoid generic Microsoft printer drivers and third-party drivers, such as BarTender. Such drivers may handle printer settings, vendor-specific options or default values differently and may therefore produce different print results.
For Zebra, SATO, CAB and other label printers, we therefore explicitly recommend using the Windows drivers provided by the respective printer manufacturer.
Set printing defaults
Open Print Management on the computer running the 365 business Print Agent:
- Open Print Management.
- Under Print Servers > [computer name] > Printers, select the required printer.
- Right-click the printer.
- Select Set Printing Defaults.
- Configure all settings required for printing.
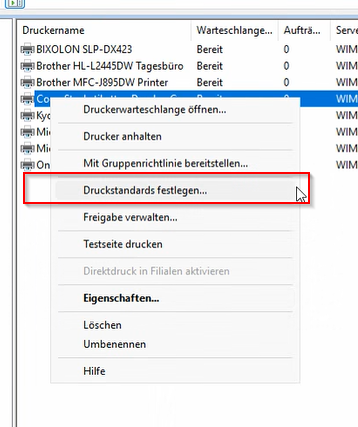
Important
When configuring the Print Agent, use Set Printing Defaults in Windows Print Management. Settings configured only through the regular printing preferences of a signed-in user may differ from those used by the Print Agent service.
No dedicated print server required
The Set Printing Defaults option is not limited to dedicated Windows print servers. It can also be used on a regular Windows client on which the Print Agent and the printer queue are installed. The values configured there are the global defaults for the printer queue and are therefore also available to the 365 business Print Agent service.
Configure the relevant printing preferences
Verify that the settings required for printing are configured correctly in the printing defaults.
For label printers in particular, check the following values:
- label format and page size,
- orientation / rotation,
- media and sensor type,
- gap / mark / die-cut label detection,
- print speed,
- print density / darkness,
- offsets and positioning,
- additional vendor-specific settings.
Important
Correct settings in the driver's regular or advanced printing preferences are not necessarily sufficient for the Print Agent. Therefore, always verify and configure the required values under Set Printing Defaults as well.
Apply the changes to the Print Agent
After changing the printing defaults, we recommend the following steps:
- Restart the 365 business Print Agent service.
- Then refresh the printer configuration in Business Central or reload the printer information provided by the Print Agent.
- Run a new test print directly from Business Central.
Attention
A successful test print from a Windows application, such as a PDF reader, is not a reliable test for printing through the Print Agent. After making changes, always test a print job directly from Business Central as well.
Best practice for label printers
For Zebra, SATO, CAB and other label printers, we recommend the following sequence:
- Install the printer on the computer running the 365 business Print Agent. Use the latest original driver provided by the printer manufacturer.
- Configure the printer-specific driver settings.
- Open Set Printing Defaults and configure the required values there.
- Restart the 365 business Print Agent service.
- Then refresh the printer information in Business Central.
- Run a test print directly from Business Central.
Summary
If a print job is output correctly from a Windows application, such as a PDF reader, but direct printing through the Print Agent is not, verify and configure the printing defaults of the printer queue through Windows Print Management.