
Connection Type
As described in the section What is 365 business Print Agent?, the 365 business Print Agent can be operated in two different connection or service modes.
The mode can be switched at any time via the Settings menu.
365 business Print Agent Cloud (Recommended)
Using the 365 business Print Agent Cloud is the recommended option.
It requires minimal setup and is ready to use immediately.
Setup Steps:
In Microsoft Dynamics 365 Business Central
- Install the 365 business Print Agent app from Microsoft Marketplace.
- In the App, select the service mode Print Agent Cloud.
- Click Authenticate Print Agent and copy the Tenant-ID from the displayed field.
In the 365 business Print Agent Config
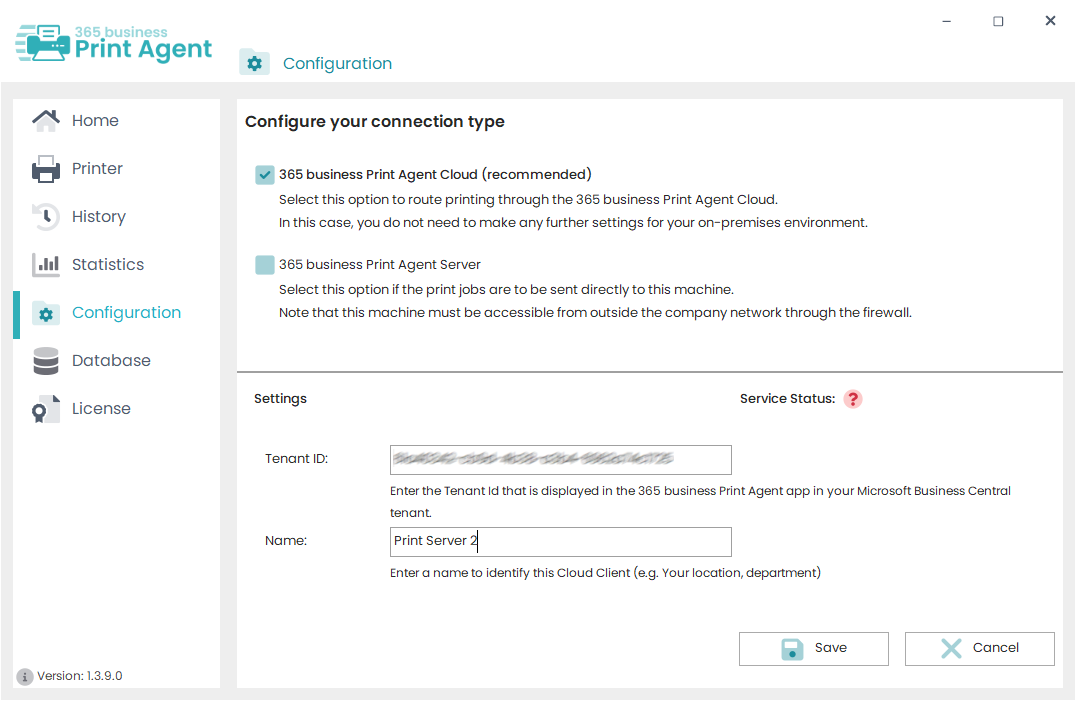
- Open the Configuration menu.
- Select the mode 365 business Print Agent Cloud.
- Paste the Tenant-ID copied in step 3.
- Assign a Name to the Cloud Client.
- Click Save to start the setup.
A dialog will appear, showing the progress visually.
Once it closes and the Service Status shows a green checkmark, the setup is complete.
Good to know
Please make sure the steps are followed in the correct order.
The installation and setup of the 365 business Print Agent App in Microsoft Dynamics 365 Business Central must be completed before configuring it in the 365 business Print Agent Config Tool.
Info
If your organization requires a Proxy for outbound internet traffic, please refer to this support article.
365 business Print Agent Server
This mode creates a Direct Connection between Microsoft Dynamics 365 Business Central and your local system.
Due to the required network configuration (firewalls, routing, etc.), this mode is only recommended for On-Premises environments.
It is not suitable for SaaS Tenants!
Setup Steps:
In Microsoft Dynamics 365 Business Central
- Install the 365 business Print Agent app from Microsoft Marketplace.
- In the app, select the service mode Direct Connection.
- Enter a name as well as the Service Address (e.g. IP or HTTPS address) and Port of your 365 business Print Agent Server.
In the 365 business Print Agent Config
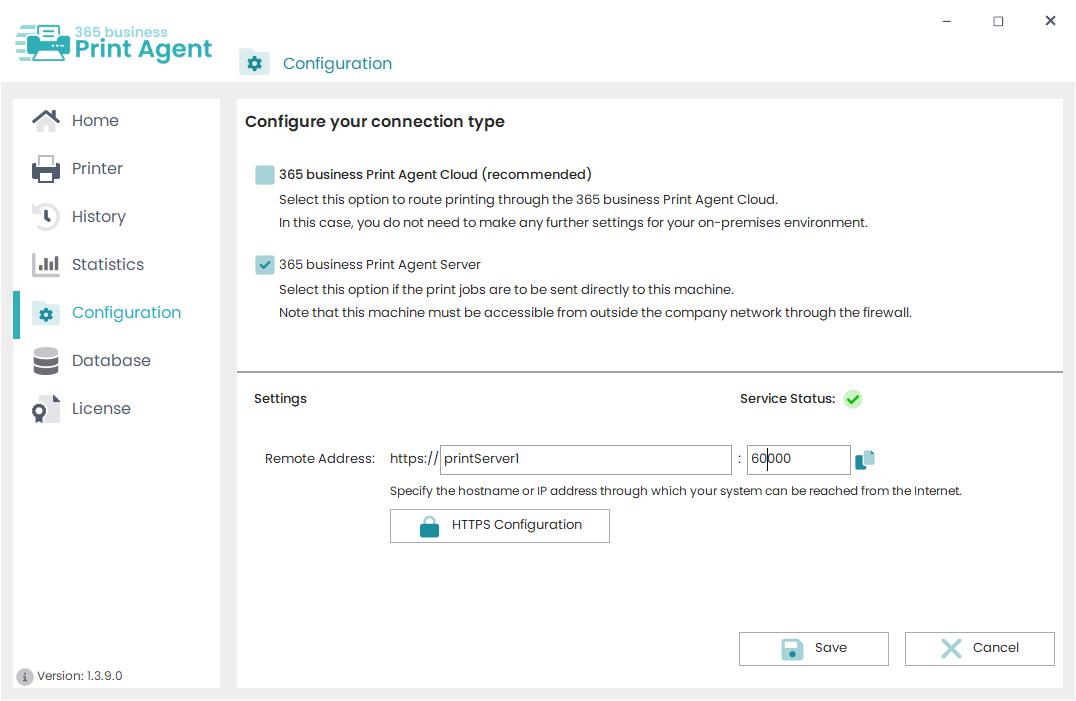
- Open the Configuration menu.
- Select the mode 365 business Print Agent Server.
- Under Remote Address, enter the hostname and port the server should bind to.
- Click Save to start the setup.
A visual dialog will appear to illustrate the setup progress.
Once closed and the Service Status shows a green checkmark, the configuration is complete.
Good to know
The 365 business Print Agent Server is now completed!
However, to make the server accessible outside your network, additional steps are required (e.g., firewall and routing configuration). Please contact your IT department or system administrator.
Info
The server can optionally run using the HTTPS protocol.
Click HTTPS Configuration and choose from three certificate options:
- PFX file
- PEM + Key file
- Windows certificate store
After saving, the HTTPS configuration will be applied automatically.
Info
If your organization requires a Proxy for outbound internet traffic, please refer to this support article.