import { Callout } from "zudoku/ui/Callout";
# Get Started
This quick guide explains how to activate 365 business Print Agent and set up a printer.
Test the 365 business Print Agent free of charge in sandbox environments of Microsoft Dynamics 365 Business Central.
In addition, there is a free 30-day trial period for real and On-Premises environments without functional restrictions.
## Prerequisites
- Microsoft Dynamics 365 Business Central 2021 release wave 1 (18.0) or newer.
- A Microsoft Windows system (Windows Server 2016 or higher recommended) to run [365 business Print Agent Service](print-agent-client-whatis.md)
- An internet connection
This quick guide focuses on the Print Agent Cloud service mode.
For setting up the direct connection, please visit the documentation.
---
## Step 1: Installation of 365 business Print Agent
Open the **Extension Marketplace** in Microsoft Dynamics 365 Business Central and search for **365 business Print Agent**.
Install the app from Microsoft Marketplace and wait until the installation is complete.
Alternatively, use the following link to install **365 business Print Agent** directly from Microsoft Marketplace:
[Install 365 business Print Agent | Microsoft Marketplace](https://marketplace.microsoft.com/en-US/product/dynamics-365-business-central/PUBID.business_development_christoph_krieg%7CAID.365businessprintagent%7CPAPPID.6fb30c19-f5d6-4e4c-b006-18fba4de1898?modalAppId=PUBID.business_development_christoph_krieg%7CAID.365businessprintagent%7CPAPPID.6fb30c19-f5d6-4e4c-b006-18fba4de1898&signInModalType=2&ctaType=2)
---
## Step 1.1: Print Agent Setup
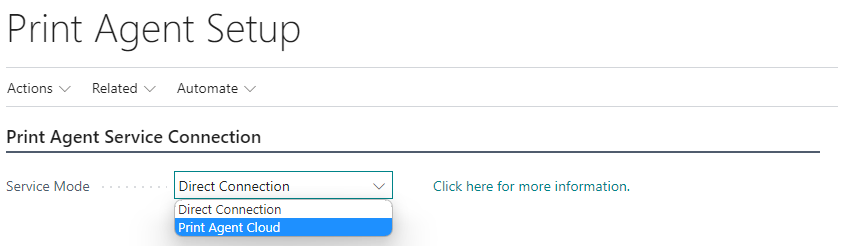
Open the **Print Agent Setup** page in Microsoft Dynamics 365 Business Central:
1. Select **Print Agent Cloud** as **Service Mode**.
[Learn more](print-agent-whatis.md#architecture)
2. Select **Authenticate Print Agent**.
3. Copy the **Tenant-ID** value by clicking on the field value.
The Tenant-ID links the Print Agent Service to your Microsoft Dynamics 365 Business Central environment.
You will need the Tenant-ID later when setting up the Print Agent Service.
4. Select **Download software...** to download the [365 business Print Agent Service](print-agent-client-whatis.md).
---
## Step 1.2: Install 365 business Print Agent service
1. Save the downloaded ZIP file on the Windows system that you want to use as _print server_ with 365 business Print Agent
2. Unzip the ZIP file (e.g. `C:\install`)
3. Run the setup file.
[learn more](print-agent-service-installation.md)
---
## Step 1.3: Print Agent Service Setup
1. Start the **365 business Print Agent** application.
2. Select **Configure**.
3. Select **365 business Print Agent Cloud (recommended)**.
4. Insert the **Tentant ID** from step 1.1.
5. Specify a **Name** to identify the client.
6. Select **Apply** to complete the setup.
---
## Step 2: Set up Printers
To be able to use printers directly in Microsoft Dynamics 365 Business Central, they must be activated.
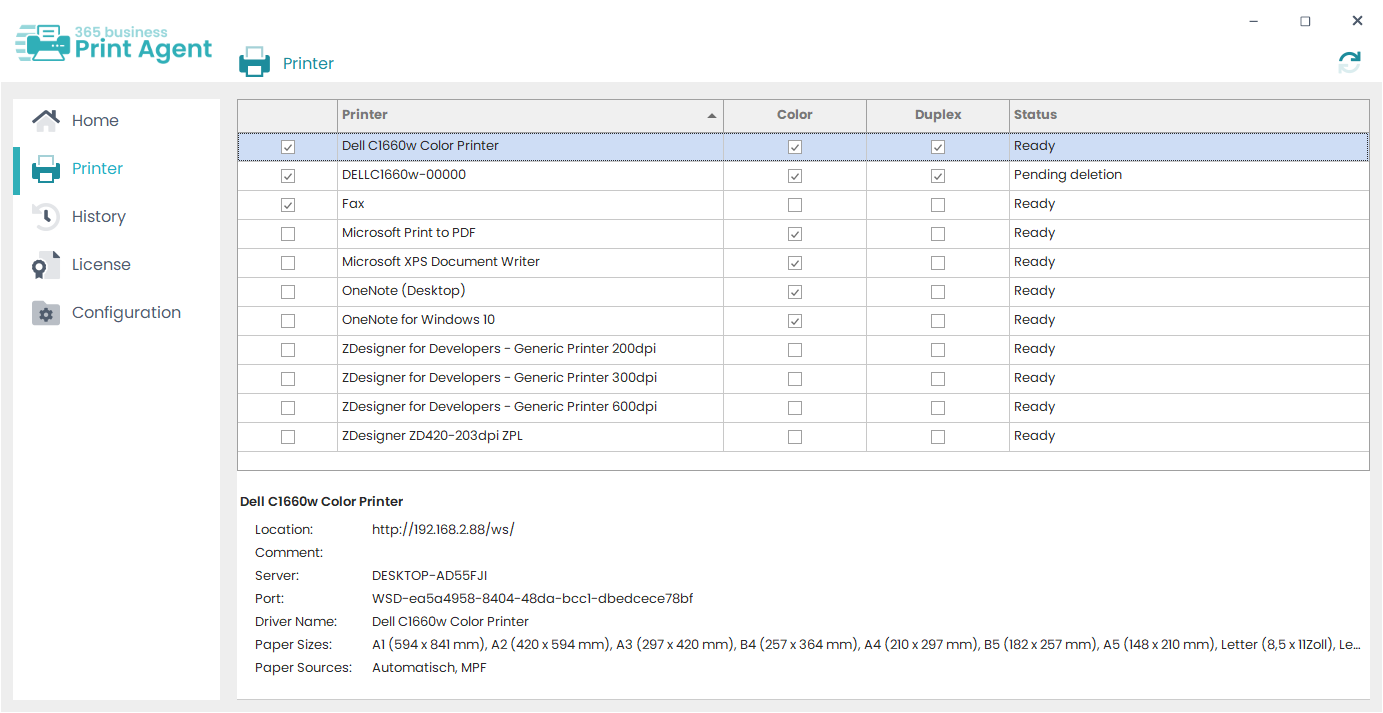
1. Open the **365 business Print Agent** application.
2. Select **Printer** to display all available printers.
3. Activate all printers that you want to share with **Microsoft Dynamics 365 Business Central**.
---
## Step 2.1: Get shared Printers
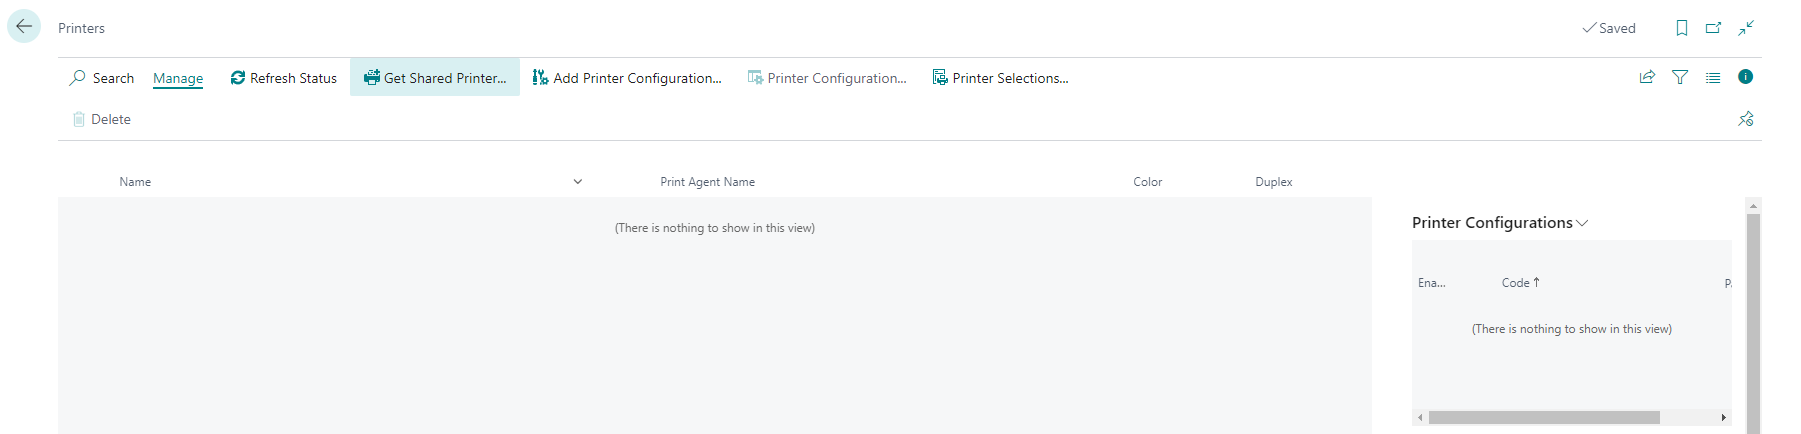
1. Open the **Printers** in Microsoft Dynamics 365 Business Central.
2. Select **Get Shared Printers...** to retrieve the shared printers.
---
## Step 2.2: Enable Printer Configuration
Shared printers are not directly available in Microsoft Dynamics 365 Business Central.
Instead, you must create Printer Configurations, which can then be selected in the Printer Selection or in the Report Request Page.
A Printer Configuration is created by the system automatically for each printer, based on the available features of the printer.
1. Select **Printer Configurations**.
2. Select **Edit**.
3. Verify the system-created configuration.
4. Select **Enabled** to enable the printer setting.
---
## Step 3: Assign Printer Configuration
To make optimal use of the printers, we recommend setting up a printer (configuration) for specific reports or users.
The configuration is done in Microsoft Dynamics 365 Business Central on the standard **Printer Selection** page.
1. Open **Printer selection**.
2. Select a **User ID** or leave the field empty (for all users).
3. Enter a **Report ID** or leave it blank (for all reports).
4. Select the **Printer Name**.
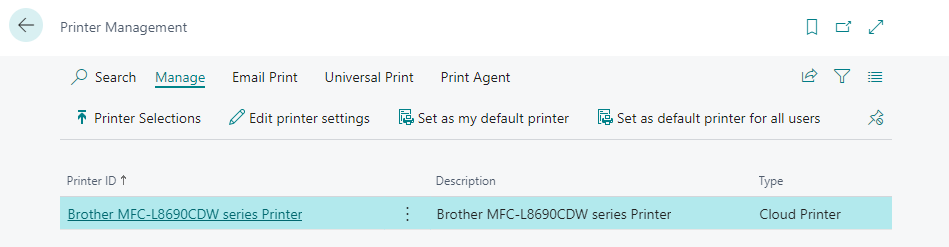
You can see all enabled printers (configurations) on the **Printer Management** page.
From here you can open printer configuration or set a printer (configuration) as default.
 ---
### See also
- [Print Agent Architecture](print-agent-whatis.md#architecture)
- [What is the Print Agent Service?](print-agent-client-whatis.md)
- [Installing Print Agent Service](print-agent-service-installation.md)
- [Print Agent Setup](setup.md)
- [Printer](printer.md)
- [Printer Configuration](printer-configuration.md)
---
### See also
- [Print Agent Architecture](print-agent-whatis.md#architecture)
- [What is the Print Agent Service?](print-agent-client-whatis.md)
- [Installing Print Agent Service](print-agent-service-installation.md)
- [Print Agent Setup](setup.md)
- [Printer](printer.md)
- [Printer Configuration](printer-configuration.md)