import { Callout } from "zudoku/ui/Callout";
# Get Started
This quick guide explains how to activate and set up 365 business E-Invoice.
## Prerequisites
- Microsoft Dynamics 365 Business Central 2024 release wave 1 (24.0) or newer.
- Microsoft 365 Mailbox *(optional, for receiving E-Documents via email)*
This quick guide focuses on receiving e-invoices in Factur-X - ZUGFeRD format via Microsoft 365 mailbox integration.
For more information on setup, please visit the documentation.
## Step 1: Install 365 business E-Invoice
Open the **Extension Marketplace** in Microsoft Dynamics 365 Business Central and search for **365 business E-Invoice**.
Install the app from Microsoft Marketplace and wait for the installation to complete.
### Step 1.1: Set up Microsoft 365 mailbox integration
To retrieve and process incoming E-Documents from Microsoft 365 mailboxes, it is necessary to configure these mailboxes accordingly. This uses the Email Accounts functionality of Microsoft Dynamics 365 Business Central.
1. Open **365 business E-Invoice Setup** via the Microsoft Dynamics 365 Business Central search.
2. Click on **New Line** and then on the Assist Edit (...) in the **Name** field to open the email account selection.
3. Select the email account you want to use for receiving invoices.
4. Click **OK** to close the email account selection.
### Step 1.2: Automate retrieval of E-Documents via E-Document service
By enabling automatic import, purchase invoices and credit memos in Factur-X / ZUGFeRD format from incoming emails are automatically processed.
1. Open **E-Document Services** via the Business Central search.
2. Select the E-Document service (e.g., **365 ZUGFERD**).
3. Ensure that **Microsoft 365 Mailbox** is selected in the **Service Integration** field.
4. Enable the **Automatic Import** option.
5. Set the **Batch Start Time** field, if desired, to specify when the import should occur.
6. Set the interval for retrieving emails in the **Minutes Between Runs** field, if desired (e.g., 1440min = 24h).
You can also manually trigger the retrieval of E-Documents from the configured Microsoft 365 mailboxes. To do this, you can call the Receive action in the E-Document service.
## Step 2: Process E-Documents
The processing of E-Documents is done automatically by the E-Document service. The E-Documents are created in Microsoft Dynamics 365 Business Central as orders, purchase invoices, or credit memos.
The basic processing procedure for orders, purchase invoices, or credit memos is as follows:
1. Open **E-Documents** via the Business Central search.
2. Open the E-Document to view the invoice details.
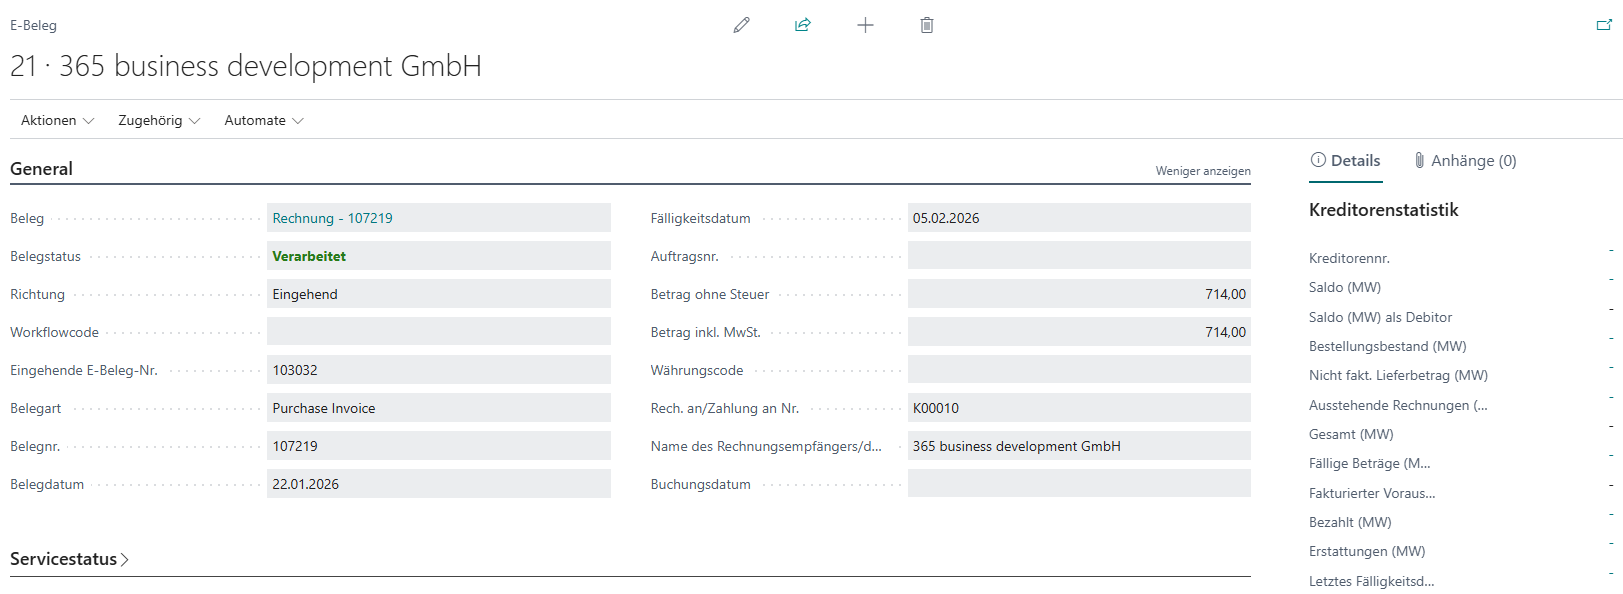
3. Check the E-Documents for completeness and correct any missing information if necessary.
4. Click on the drilldown link **Document** to open the order, purchase invoice, or credit memo.
5. Post the document.
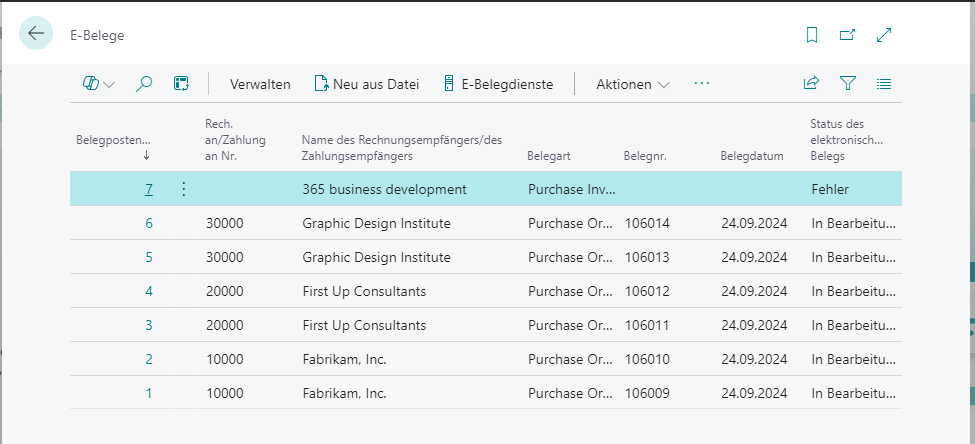
Errors may occur during the processing of E-Documents that prevent automatic processing. To identify problematic e-invoices, use the Business Central search and open the **E-Documents** area. There you can identify problem cases by an **Error** status in the **Electronic Document Status** column.
1. Open **E-Documents** via the Business Central search.
2. Identify a faulty document and open it.
3. In the **E-Document** view, you can expand the **Error Messages** area to see details of the issues.
Possible causes of problems are varied, such as:
* Unknown vendors
* Missing link between your items and vendor items
* Incorrect assignment of units (units of measure) to items.
### Step 2.1: Process E-Documents - Handle errors
To handle problematic E-Documents, 365 business E-Invoice provides the **Import Wizard**. This assists you in step-by-step troubleshooting of issues in your E-Document and allows you to manually correct them.
1. Call the **Import Wizard** action in the E-Document.
2. The Import Wizard assists you in step-by-step troubleshooting (see [Import Wizard](import-assistant.md)).
## See also
- [Setup](setup.md)
- [Import Wizard](import-assistant.md)