import { Callout } from "zudoku/ui/Callout";
# Establishing Bank Account Connections
To retrieve bank transactions or account statements and initiate payments, you must first establish a connection to your bank. This connection is made via [finAPI](https://www.finapi.io/), which acts as an interface between Microsoft Dynamics 365 Business Central and your bank.
The bank account connection is a one-time process that allows you to integrate your bank accounts into 365 business Banking. After a successful connection, you can automate the retrieval of bank transactions and initiate payments directly from Microsoft Dynamics 365 Business Central.
## Prerequisites
Before starting the bank account connection, ensure that you have set up a [banking user in Microsoft Dynamics 365 Business Central](banking-user-setup.md). If the user setup has not yet been completed, the setup will automatically appear when you attempt to establish the bank account connection.
Bank communication may require multi-factor authentication, such as via a mobile app or SMS TAN, or direct bank interaction. In this case, a corresponding window will appear, opening a pop-up for your bank.
Please ensure that pop-ups are not blocked in your browser and allow pop-ups from your Microsoft Dynamics 365 Business Central URL (e.g., https://businesscentral.dynamics.com).
## Step-by-Step Guide
Follow these steps to establish your bank account connection in 365 business Banking:
1. Select **Bank Accounts** in the search bar of Microsoft Dynamics 365 Business Central.
2. Select the action **Connect Bank Accounts** in the **Banking** group.
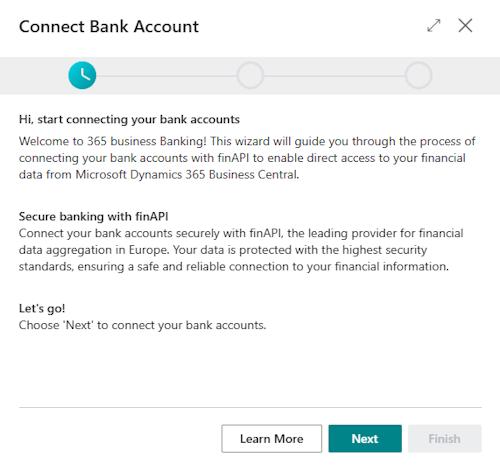
3. Select **Next** to start the connection process.
4. Enter the bank name, BIC/SWIFT code, or IBAN of your bank account to select your bank.
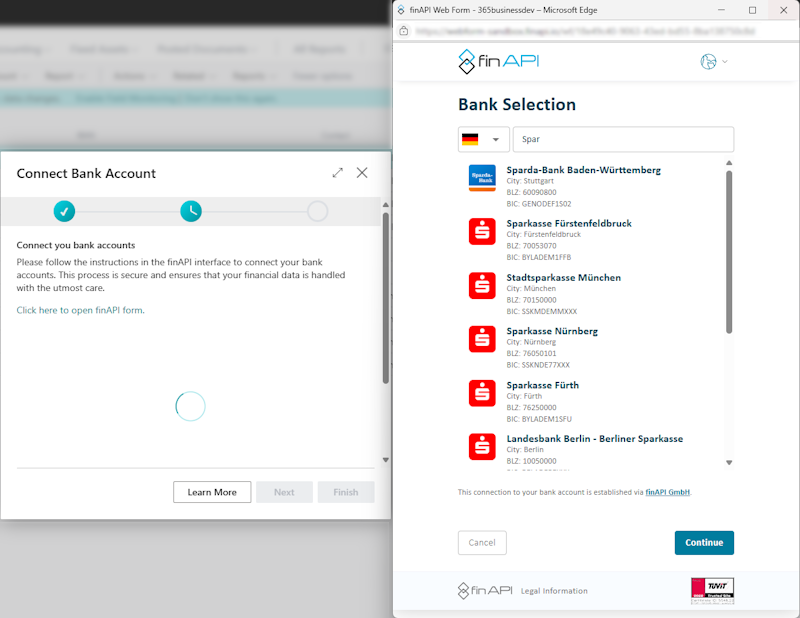
5. Log in with your bank credentials. This may vary depending on the bank, but typically requires your account number and PIN.
6. Follow the on-screen instructions to establish the connection to your bank. This may include confirming security questions or entering a TAN code.
7. Select the accounts you want to connect and confirm your selection.
8. After a successful connection, the number of connected accounts will be displayed.
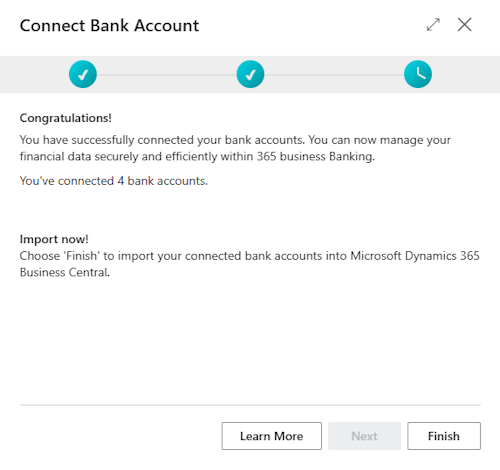
9. Select **Finish** to import the bank accounts and complete the connection.
The bank account connection can be executed as often as needed to connect additional bank accounts. When reconnecting, no data is deleted; only new accounts are added. Existing accounts are updated if their information has changed.
### Importing Bank Accounts
After successfully connecting to your bank, the bank accounts are automatically imported into Microsoft Dynamics 365 Business Central.
If you have already set up bank accounts in Microsoft Dynamics 365 Business Central, you can connect these accounts with finAPI to take advantage of 365 business Banking. Follow the steps below. During the import of bank accounts, a match is performed using the IBAN to avoid duplicate entries. If a bank account already exists in Microsoft Dynamics 365 Business Central, it will be updated instead of creating a new account.
Please note that for existing bank accounts in Microsoft Dynamics 365 Business Central, the bank account reconciliation must be performed to ensure that account statements are correct and no duplicate entries are imported.
Alternatively, you can use the Last Statement Date field in the bank account card to specify from which date new account statements should be retrieved.
As part of the bank account import, the following information is retrieved:
- **Account Name**: The name of the bank account.
- **IBAN**: The International Bank Account Number used to identify the account.
- **BIC/SWIFT Code**: The Bank Identifier Code used to identify the bank.
- **Account Currency**: The currency in which the bank account is maintained.
- **Bank Account Number**: The number assigned to the bank account by the bank.
- **Account Type**: The type of bank account (e.g., checking account, savings account).
Additionally, the bank's information (e.g., address) is retrieved and stored in the bank account card.
## Selecting bank accounts for the import
If **new** bank accounts were connected, the wizard points out in the **Congratulations!** step that the accounts to be imported can be selected, and **Next** leads to the selection.
The **Select your bank accounts** step lists the connected accounts with **IBAN**, **Bank Account No.**, **Currency** and **Account Holder**. Use the **Connect** column to decide per account whether it is imported into Business Central. Choosing **Finish** creates the selected accounts.
{/* TODO Screenshot: /assets/images/365-business-banking/connect-select-bank-accounts.en-US.png — Connect Bank Accounts wizard, Select your bank accounts step */}
Bank accounts that are **not** selected in this step are removed from the banking service and their authorization is revoked. If such an account is to be kept in Business Central later on, the connection has to be established again for it.
The selection step only appears when new accounts were actually connected. If only accounts that are already known are returned, the wizard finishes with the import directly, as before.
For more information, see [Bank Account Import Selection](features/details/bank-account-connection-selection.mdx).
## Updating Bank Accounts
If the information for an already connected bank account changes, you can update the connection to retrieve the latest data. Follow these steps:
1. Select **Bank Accounts** in the search bar of Microsoft Dynamics 365 Business Central.
2. Select the action **Retrieve Bank Accounts** in the **Banking** group.
## Removing Bank Account Connections
If you want to remove a bank account connection, follow these steps:
1. Select **Bank Accounts** in the search bar of Microsoft Dynamics 365 Business Central.
2. Select the bank account you want to remove.
3. Select the action **Delete**.